To make great French press coffee, use coarse grounds, hot water, a measured coffee ratio, and a four-minute steep.
In American homes, a French press offers a simple way to make fresh coffee without paper filters, electricity, or complicated settings. You only need a press, ground coffee, hot water, and a few minutes. Whether you are making your first cup before work or brewing a pot for a weekend breakfast, the basic method stays the same.
The secret is to control a few simple things: how much coffee you use, how finely you grind it, how hot your water is, and how long the grounds steep. These choices shape the strength, flavor, and texture of your drink. Once you understand them, you can adjust each batch to suit your taste instead of guessing every morning.
This guide explains how to use a French press coffee maker step by step, including practical coffee-to-water ratios, brewing times, common mistakes, cleaning advice, and ways to fix bitter or weak coffee. The method uses a four-minute starting time and a coarse grind, which you can adjust as you learn what works best for your beans.
A French press is a manual coffee maker that steeps ground coffee in hot water and then separates the grounds with a metal mesh filter. It usually has a glass, stainless steel, or other heat-resistant carafe, a lid, a plunger, and a filter assembly. You do not need paper filters or an automatic brewing machine.
Unlike a drip coffee maker, which passes water through a bed of coffee, a French press keeps the grounds immersed in water during brewing. This method is called immersion brewing. It gives you direct control over the steeping time and coffee strength.
The metal filter allows more of the coffee’s natural oils and some fine particles to reach the cup than a typical paper filter does. That often creates a fuller body and a richer mouthfeel. The trade-off is that French press coffee may contain a little sediment, especially when the grind is too fine or the coffee is poured carelessly.
A French press works with many types of coffee beans, including light, medium, and dark roasts. Your preferred roast depends on taste rather than the brewer itself. Medium and dark roasts often produce familiar, rich flavors, while lighter roasts may highlight fruit, floral notes, or acidity.
Source: kitchenwink.com
Carafe
The main container holds the coffee grounds and hot water during brewing. Handle glass models carefully and avoid sudden temperature changes.
Plunger
The rod lets you push the filter down through the brewed coffee to separate most of the grounds.
Mesh filter
The metal screen traps larger particles while allowing coffee oils and some fine particles into the finished drink.
Lid
The lid helps retain heat during steeping and guides the plunger. Keep it fitted securely while brewing and pressing.
What You Need Before You Start
Gather your equipment and measure your ingredients before you begin. Having everything ready makes the process easier and helps you repeat a good result. You can make French press coffee with basic kitchen tools, although a scale and thermometer offer more control.
Choose fresh coffee that you enjoy drinking. Whole beans usually retain their aroma better than ground coffee when stored well, so grinding just before brewing can improve freshness. If you buy pre-ground coffee, choose a coarse grind intended for French press brewing when available.
Use clean, good-tasting water. Since coffee is mostly water, unpleasant tap-water odors or flavors can carry into your cup. Filtered water is a useful option if your tap water tastes strongly of chlorine or minerals, but you do not need a special bottled water brand.
Source: coffeesignatures.blogspot.com
French press
Use a clean press with an intact filter and a carafe designed to hold hot water.
Coffee
Start with fresh whole beans or coarse pre-ground coffee. Avoid very fine espresso-style grounds for a standard French press.
Hot water
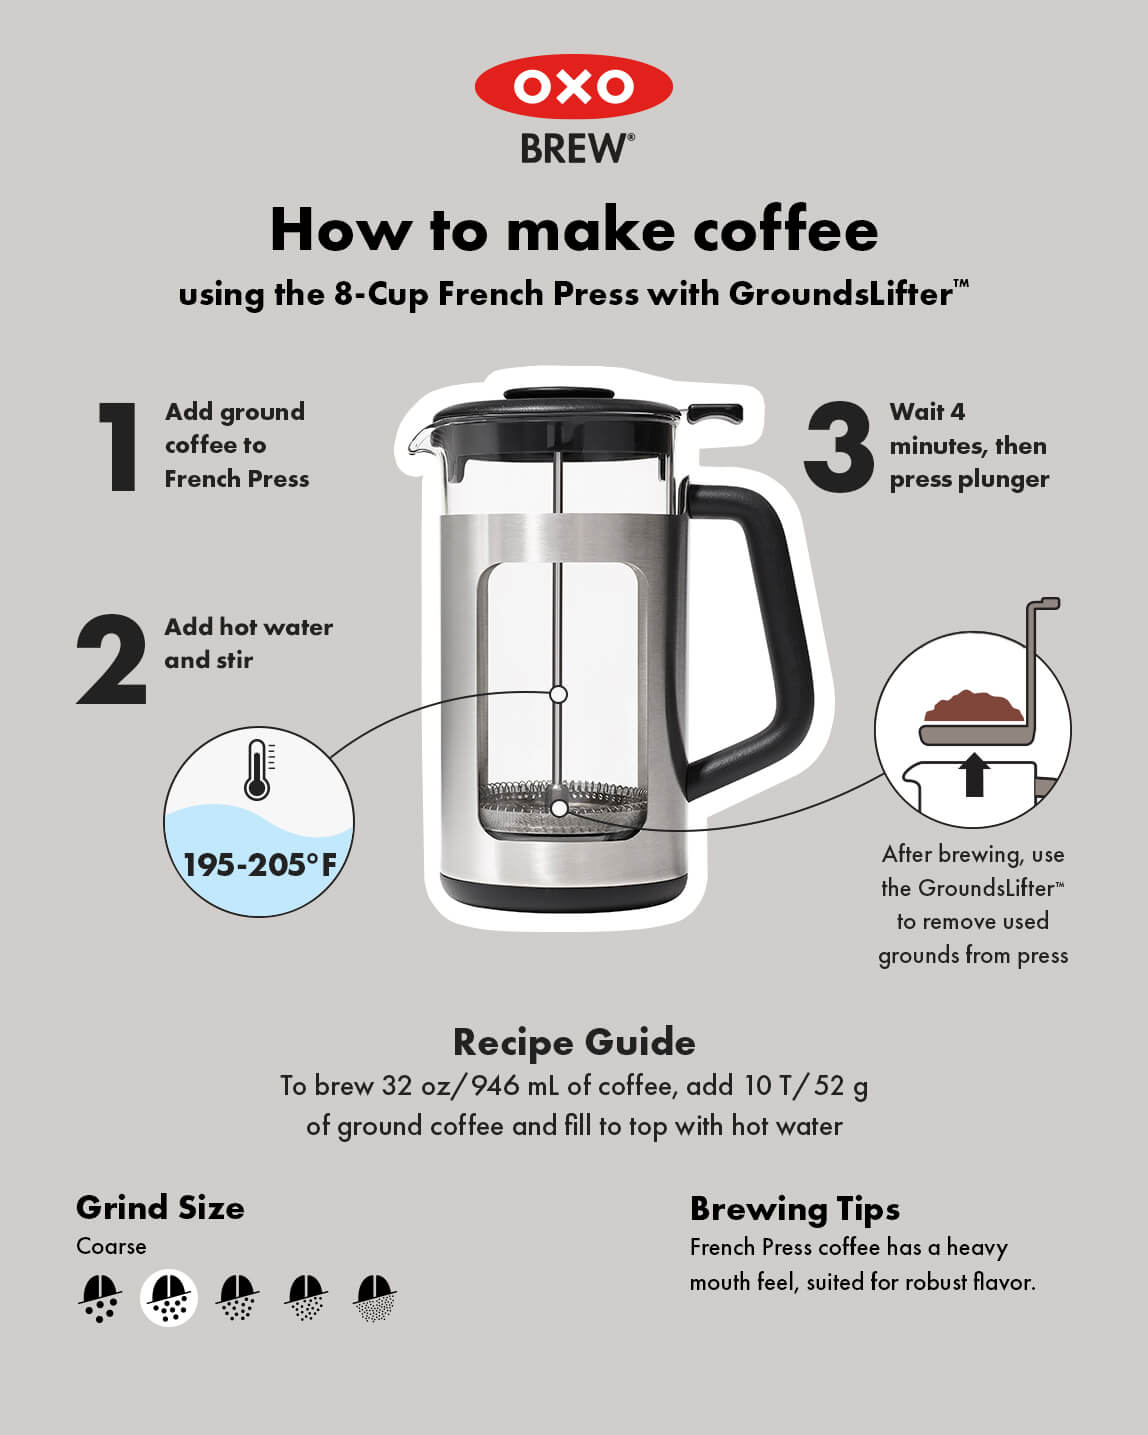
Use fresh water heated to a suitable brewing temperature, ideally around 195–205°F as a starting range.
Measuring tools
A digital kitchen scale gives more consistent results than measuring coffee by volume. A kettle with temperature control is helpful but optional.
Timer and stirring utensil
A timer helps you repeat the same steeping time. Use a suitable wooden or plastic utensil if your press manufacturer advises against metal utensils.
Check Your French Press Before Brewing
Make sure the carafe has no cracks, chips, or other damage. Check that the mesh filter sits flat and that the plunger moves smoothly. If the filter is bent or the parts are loose, replace the damaged component before use.
Follow the manufacturer’s instructions for your specific press. Some models use different filter designs or materials, and not every carafe has the same heat limits. Never pour boiling water into a vessel unless it is designed to handle that temperature.
Inspect the carafe
Look for damage before adding hot water, especially if the press uses glass.
Check the filter
Confirm that the screen and supporting parts are assembled correctly.
Choose the Right Coffee-to-Water Ratio
Start with a coffee-to-water ratio of 1:15 by weight. That means using 1 gram of coffee for every 15 grams of water. This is a practical starting point for a balanced cup, not a strict rule that every coffee must follow.
For example, 30 grams of coffee with 450 grams of water gives you a 1:15 ratio. If you prefer a stronger cup, try 30 grams of coffee with 420 grams of water, which is close to a 1:14 ratio. For a lighter brew, use 30 grams of coffee with 480 grams of water, which gives you a 1:16 ratio.
A kitchen scale makes these amounts easy to repeat. If you do not own one, you can use a measuring scoop, but the weight of a scoop varies with grind size, bean type, and how tightly the coffee is packed. Treat volume measurements as estimates rather than exact equivalents.
Remember that the amount of coffee you prepare should fit the size of your press. Do not fill the carafe to the rim. Leave room for the grounds, water, and safe movement of the plunger.
Source: brew-coffee.ca
For one large mug
Try 20 grams of coffee and 300 grams of water. Adjust the quantities to suit your mug and preferred strength.
For two small servings
Try 30 grams of coffee and 450 grams of water, then divide the brewed coffee between two cups.
For a larger batch
Use 40 grams of coffee and 600 grams of water if your press has enough capacity.
Should You Measure Coffee by Weight or by Volume?
Weight is more reliable because different beans and grind sizes occupy different amounts of space. Two scoops of coffee can have different weights even when the scoop size stays the same. A scale helps you recreate a cup you enjoy.
If you only have a tablespoon, begin with your usual scoop and record how much water you add. Once you find a combination you like, keep the same measurements and change one variable at a time.
Best for consistency
Measure both coffee and water by weight whenever possible.
Best for convenience
Use a consistent scoop and the same water level when a scale is unavailable.
How to Use a French Press Coffee Maker Step by Step
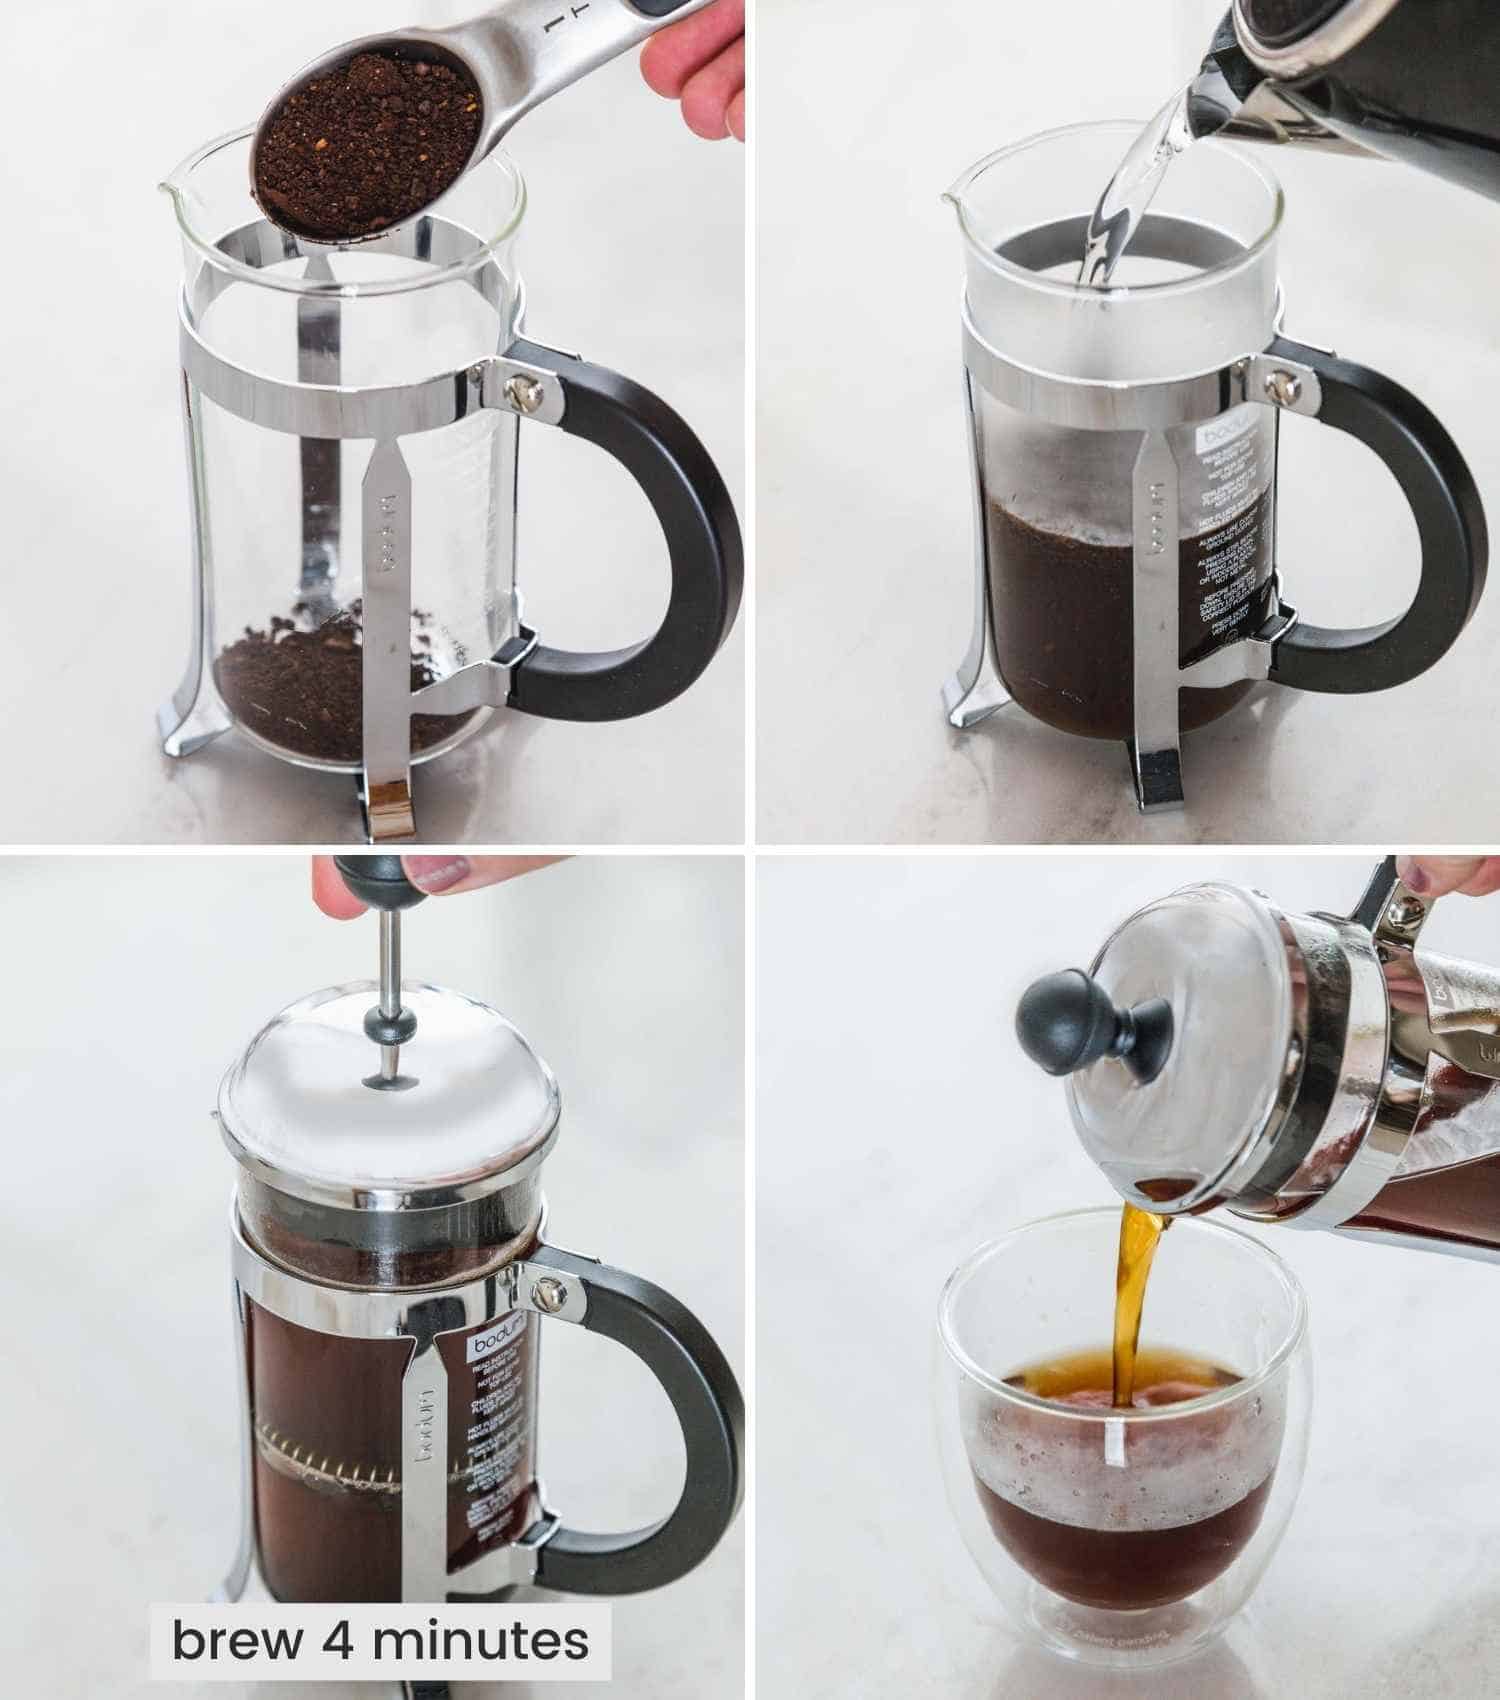
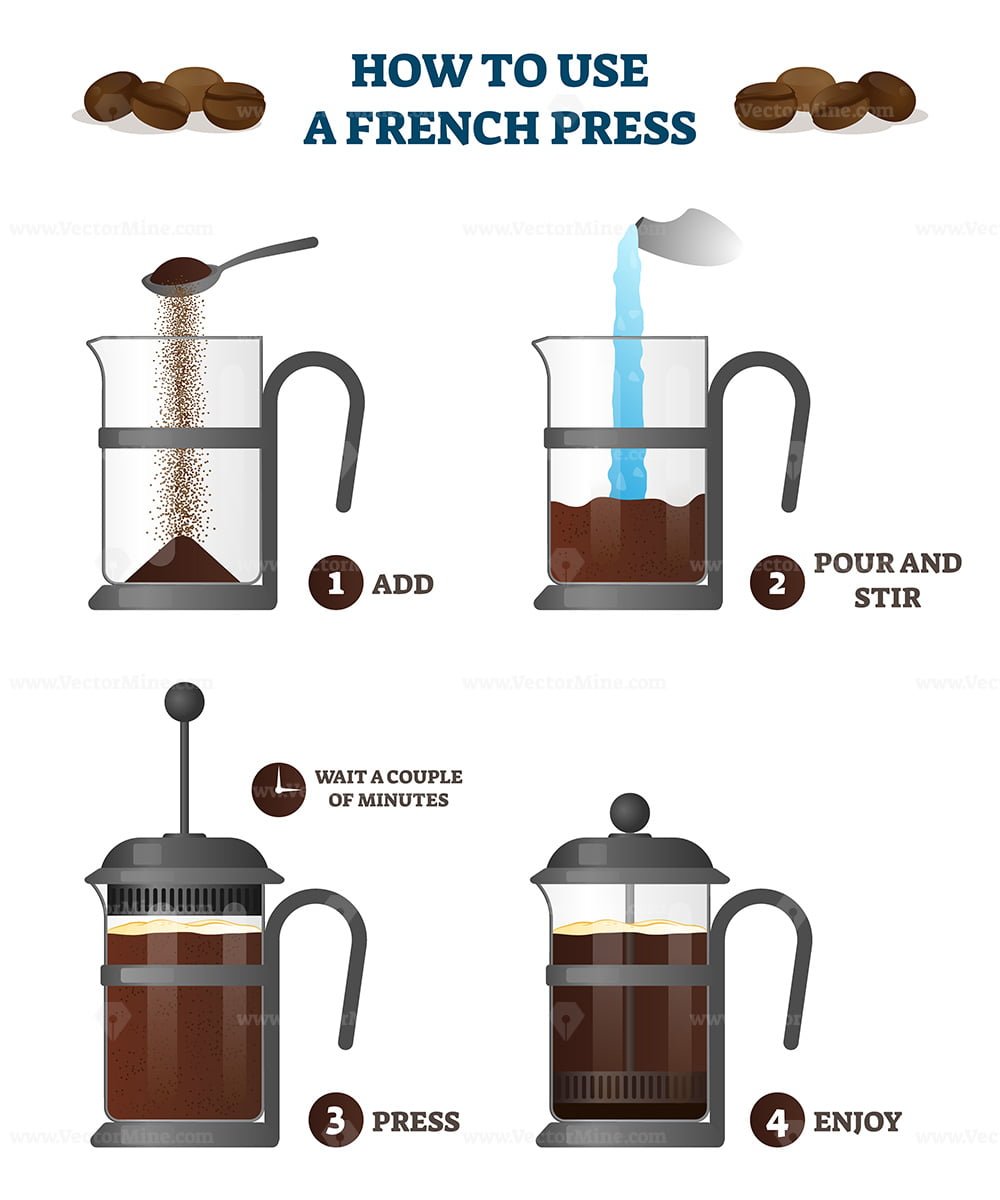
The basic method is simple: warm the press, add coarse coffee, pour in hot water, steep for about four minutes, and press slowly. The exact flavor will depend on your beans, grind, water, and preferences, so use this process as a repeatable starting point.
Source: animalia-life.club
Step 1: Heat the Water
Heat fresh water to around 195–205°F. If you do not have a temperature-controlled kettle, bring the water to a boil and let it cool briefly before pouring. The time needed to cool varies with the amount of water, kettle, room temperature, and vessel, so a thermometer gives you better control.
Water that is too cool can produce a flat or underdeveloped cup, while very hot water is not automatically a problem if it falls within the normal brewing range. The key is to use a repeatable temperature and adjust it if your coffee tastes too sharp, dull, or harsh.
Practical target
Aim for 195–205°F as a starting range and adjust for your coffee and taste.
Step 2: Warm the Carafe
Pour a small amount of hot water into the empty press, swirl it gently, and discard the water. This preheats the carafe and can help the brewing water stay closer to its starting temperature.
Use caution when handling the hot vessel. Set it on a stable, heat-resistant surface, and do not preheat a glass press with water hotter than its manufacturer allows.
Step 3: Grind the Coffee Coarsely
Grind your beans to a texture similar to coarse sea salt. The particles should be fairly even, with few powder-like fines. A burr grinder can produce a more consistent grind than many basic blade grinders.
A grind that is too fine can pass through or clog the mesh, make the plunger difficult to push, and leave more sediment in the cup. A grind that is too coarse may slow extraction and create weak or sour-tasting coffee.
Use a coarse grind
Choose coarse grounds for a standard French press and adjust slightly finer only if your coffee repeatedly tastes under-extracted.
Grind just before brewing
Fresh grinding can preserve more aroma, although well-stored pre-ground coffee can still make a good cup.
Step 4: Add the Coffee Grounds
Place the measured coffee grounds in the warm, empty carafe. Gently shake the press if needed to level the grounds across the bottom. Avoid spilling grounds around the rim because they can stick to the lid or make cleanup harder.
Step 5: Pour in the Hot Water
Pour the hot water evenly over the grounds until you reach your measured amount. Try to wet all the coffee rather than pouring into just one small spot. The grounds should become saturated and begin releasing their aroma.
If the top layer remains dry, gently stir with a suitable utensil to help all the grounds contact the water. Stir carefully so you do not splash hot liquid or strike a fragile glass carafe.
A gentle stir can help wet any grounds that remain dry on the surface.
Step 6: Let the Coffee Steep
Place the lid on the press with the plunger raised. Start a timer for about four minutes. This gives the water time to extract soluble compounds from the grounds and is a useful baseline for many standard French press recipes.
Keep the press on a stable surface while the coffee steeps. You do not need to pump the plunger or repeatedly stir the coffee. If you want to explore different flavors later, change the steeping time in small steps and compare the results.
Start with four minutes
Use the same steeping time for your first few batches so you can judge the effect of other changes.
Avoid unnecessary agitation
A brief stir to wet the grounds is enough for a straightforward method.
Step 7: Press the Plunger Slowly
When the timer ends, hold the lid securely and press the plunger down with steady, gentle pressure. Keep the plunger straight and let the mesh filter move through the coffee at a controlled pace.
If the plunger meets strong resistance, stop rather than forcing it. Very fine grounds, a clogged filter, or an incorrectly assembled screen can make pressing difficult. Forcing the rod may cause hot coffee to splash or damage the press.
Use steady pressure
Lower the plunger slowly instead of pushing it down in one quick movement.
Stop if it sticks
Check the grind and filter assembly after the press has cooled enough to handle safely.
Step 8: Pour and Serve Immediately
Pour the brewed coffee into your mug or a separate serving vessel soon after pressing. Leaving the coffee in contact with the grounds allows extraction to continue, which can change its flavor over time.
Pour gently to avoid stirring up sediment at the bottom of the carafe. A small amount of fine material is normal with a metal mesh filter, so you do not need to press harder to remove every particle.
Enjoy the coffee as it is or add milk, cream, sugar, or another preferred addition. Taste the plain brew first if you want to learn how changes in the recipe affect its flavor.
Serve promptly
Transfer unused coffee to a separate container instead of leaving it over the grounds.
Pour gently
Keep the final pour smooth to limit sediment in your cup.
Find the Best Grind, Temperature, and Brewing Time
A consistent recipe gives you a useful starting point, but small changes can improve the cup. The grind controls how quickly water reaches the coffee’s interior and how easily compounds dissolve. Temperature and steeping time also affect extraction, while the coffee-to-water ratio has a major effect on strength.
If your coffee tastes wrong, avoid changing everything at once. Keep the ratio, water temperature, and steeping time steady while you adjust the grind. Once you find a suitable grind, you can fine-tune the other variables.
Source: artofit.org
Choose a Coarse and Even Grind
A coarse grind is the usual starting point for French press brewing because it is easier to separate from the liquid with a mesh filter. An even grind also helps reduce the mix of over-extracted fine particles and under-extracted large pieces.
If your coffee is consistently weak or sour, try grinding slightly finer. If it tastes harsh, contains excessive sediment, or makes the plunger hard to push, try a coarser setting. Make small changes so you can tell which adjustment helped.
Adjust Water Temperature Carefully
Water around 195–205°F is a practical starting range for many coffees. Some beans respond well to slightly cooler water, especially when a hotter brew tastes too harsh. Other coffees may benefit from a higher temperature within a suitable brewing range if they taste weak.
Do not treat one temperature as a universal rule. Roast level, grind size, water composition, and personal taste all affect the result. A temperature-controlled kettle makes repeated trials easier, but careful consistency matters more than owning special equipment.
Use Four Minutes as Your Baseline
Four minutes is a common starting time for French press coffee. A shorter brew may taste lighter or less developed, while a longer brew can increase extraction and may emphasize harsher flavors in some combinations of beans and grind size.
Try three and a half, four, and four and a half minutes with the same beans and ratio if you want to compare. Taste each batch under similar conditions. Small changes are easier to judge than a large jump from one brewing time to another.
French Press Coffee Ratios for Different Serving Sizes
The easiest way to scale a French press recipe is to keep the same coffee-to-water ratio and increase or decrease both ingredients together. The table below uses a 1:15 ratio, which provides a practical starting point for everyday brewing.
These amounts refer to the ingredients added before brewing, not the final volume of coffee in the cup. The finished amount will be lower than the water added because some water remains in the grounds and filter.
Source: homegrounds.co
Suggested Starting Measurements
Use the table as a guide, then adjust the amount to fit your press and mug. If you prefer stronger coffee, use a little more coffee or slightly less water. Keep the change modest at first so the flavor does not become too intense.
15 grams of coffee
Use about 225 grams of water for a small serving.
20 grams of coffee
Use about 300 grams of water for one generous mug.
30 grams of coffee
Use about 450 grams of water for a larger serving or two small cups.
40 grams of coffee
Use about 600 grams of water for a larger batch, provided your press has enough capacity.
50 grams of coffee
Use about 750 grams of water for a substantial batch in a suitably sized press.
How to Make Stronger or Milder Coffee
For stronger coffee, try a ratio of 1:14. For a milder cup, try 1:16. At a fixed water amount, adding more coffee increases the amount of coffee available for extraction, while reducing the coffee makes the resulting drink less concentrated.
Do not confuse strength with bitterness. Strong coffee can still taste balanced, and weak coffee can still taste harsh if the grind, temperature, or brewing time is poorly suited to the beans. Adjust the ratio to control strength and the other variables to improve flavor.
How to Make French Press Coffee Taste Better
Better French press coffee starts with fresh ingredients and repeatable measurements. You do not need expensive equipment to improve your cup. Focus on freshness, clean equipment, even grounds, and a brewing method that you can repeat each day.
Coffee loses aroma over time after roasting and grinding, especially when exposed to air, heat, light, and moisture. Store beans in a cool, dry place in a sealed container, and buy an amount you can use while the coffee still tastes fresh. Avoid storing coffee in a damp location or near a hot oven.
Source: qaqooking.wiki
Use freshly ground beans
Grinding just before brewing can preserve more aroma than grinding far in advance.
Use clean water
Water with a neutral, pleasant taste helps the coffee’s own flavors come through.
Preheat the carafe
A quick rinse with hot water can reduce the initial temperature drop during brewing.
Keep a simple brew log
Record the bean, ratio, grind setting, temperature, and steeping time when you find a cup you like.
Change one variable at a time
A controlled adjustment makes it easier to identify the cause of an improvement or problem.
Choose Beans That Match Your Taste
Medium-roast beans are a useful starting point because they can offer a balance of sweetness, body, and acidity. Dark roasts often have deeper roasted notes, while light roasts can bring out brighter fruit-like or floral flavors. These are general tendencies, not guarantees for every coffee.
Try a few origins and roast levels rather than assuming that one kind is best for a French press. The brewer can work with a wide range of beans, and the best option is the one whose flavor you enjoy.
Reduce Excess Sediment
French press coffee naturally contains more fine particles than coffee made with many paper filters. You can reduce sediment by using a consistent coarse grind, keeping the filter clean, and pouring slowly. A little sediment does not automatically mean the coffee was brewed incorrectly.
If your cup has a large amount of grit, check whether your grinder produces too many fine particles. Also inspect the mesh screen for damage or poor assembly. Replace a worn filter if it no longer separates the grounds properly.
Common French Press Problems and How to Fix Them
Most French press problems come from the grind, ratio, water temperature, steeping time, or equipment condition. The easiest fix depends on what you notice in the cup and how the plunger behaves. Use the following guide to identify the likely cause before changing your recipe.
Source: storage.googleapis.com
Why Does French Press Coffee Taste Bitter?
Bitter coffee may result from excessive extraction, very fine grounds, a long steep, or beans whose roast profile naturally tastes strongly roasted. Stale coffee and dirty equipment can also create unpleasant flavors. Bitterness alone does not identify one exact cause.
Start by using a coarser grind if the grounds are fine, then check that you are following a consistent brewing time. Clean the filter and carafe thoroughly. If the coffee still tastes too bitter, try a slightly shorter steep or a different roast.
Likely cause
Fine grounds, excessive steeping, strongly roasted beans, or stale residue.
First adjustment
Use a coarser grind and keep the rest of the recipe unchanged.
Why Is My French Press Coffee Weak?
Weak coffee often means the recipe uses too little coffee for the amount of water, although a coarse grind or low brewing temperature can also contribute to under-extraction. Begin by checking the ratio before making other changes.
If you used a large amount of water with a small scoop of coffee, increase the coffee slightly or reduce the water. If the ratio is already suitable, try a somewhat finer grind while keeping the steeping time consistent.
Likely cause
Too little coffee, insufficient extraction, or an inconsistent measurement.
First adjustment
Measure the ingredients and try a 1:15 ratio by weight.
Why Does My Coffee Taste Sour?
A sharp, sour taste can occur when the coffee is under-extracted, but some light-roast coffees naturally have bright acidity. The distinction depends on whether the flavor feels lively and pleasant or thin, sharp, and unfinished.
If the cup tastes unpleasantly sour, try grinding slightly finer or using water toward the warmer end of the recommended range. Keep the ratio and steeping time steady while you test the change.
Why Is the Plunger Hard to Push?
A plunger that resists movement may indicate grounds that are too fine, a clogged screen, or a filter assembly that is not fitted correctly. Never force it down because hot liquid can escape around the plunger or spill from the carafe.
Stop pressing and allow the coffee to settle. Once the press is safe to handle, inspect the filter and use a coarser grind for the next batch. Clean the screen thoroughly if coffee oils or fine particles have collected on it.
Why Is There So Much Coffee Grit in My Cup?
Some sediment is normal because the metal mesh allows small particles to pass through. Excessive grit can result from a very fine grind, an uneven grinder, a damaged screen, or a fast pour that disturbs the grounds at the bottom.
Try a coarser, more even grind and pour the coffee slowly. Check the screen for damage if the problem continues. Avoid pressing the plunger harder in an attempt to trap every particle.
How to Clean and Maintain a French Press
Clean your French press after each use to remove wet grounds and coffee oils. Residue left on the mesh or inside the carafe can develop stale odors that affect the next batch. Regular cleaning also makes it easier to spot damage before brewing.
Let the press cool enough to handle safely before taking it apart. Follow the manufacturer’s instructions for disassembly, washing, and dishwasher use because the carafe and filter materials vary between models.
Source: www.pinterest.com
Discard the grounds
Scoop or tap the used grounds into a compost bin or trash container. Avoid sending large amounts down the sink because grounds can collect in plumbing.
Rinse the carafe
Use warm water to remove loose grounds before washing the vessel with dish soap.
Clean the filter
Rinse the mesh and surrounding parts carefully. Coffee oils can cling to the screen, so use a soft brush when needed.
Wash and dry
Wash all dishwasher-safe parts according to the manufacturer’s directions, then let them dry fully before storage.
Inspect regularly
Look for cracks, bent mesh, loose fittings, and worn seals. Replace damaged parts before using the press again.
How Often Should You Deep-Clean the Filter?
The filter needs more than a quick rinse if oils or fine grounds begin to build up. Disassemble it as directed by the manufacturer and wash the screen and its supporting parts thoroughly. The required frequency depends on how often you brew and how much residue collects.
Avoid abrasive tools that may damage the mesh or any protective coating. If the filter remains clogged, smells stale after cleaning, or no longer fits securely, inspect the parts for wear and replace them if needed.
Can You Put a French Press in the Dishwasher?
Some French press parts are dishwasher-safe, while others require hand-washing. Check the instructions for your exact model before putting any part in the dishwasher. Do not assume that a glass carafe, wooden handle, plastic component, or metal filter can all tolerate the same cleaning method.
French Press Safety Tips You Should Know
Hot water and hot coffee can cause burns, so use your press on a stable surface and keep the handle secure while pouring. Glass carafes need particular care because a crack or sudden temperature change can cause the vessel to break. Check the manufacturer’s temperature and handling guidance before use.
Never force a stuck plunger or fill the press beyond its safe capacity. If the filter blocks, hot liquid may rise or escape around the plunger. Stop pressing and let the coffee settle before inspecting the equipment.
Keep the press away from the edge of a counter and out of reach of young children while it contains hot liquid. Use oven mitts only if appropriate for the situation and maintain a firm grip on the handle. Do not place a standard French press directly on a stove or other heat source unless the manufacturer explicitly designed it for that purpose.
Source: homegrounds.co
Avoid sudden temperature changes
Do not pour very hot water into a cold, damaged glass carafe if the manufacturer warns against thermal shock.
Press gently
Stop if the plunger becomes difficult to move. Never use your full body weight to force it down.
Handle the lid carefully
Keep the lid fitted and your hand positioned securely while pressing and pouring.
Clean after cooling
Allow the press to cool enough to handle safely before disassembling the filter.
Frequently Asked Questions
Q
How long should coffee steep in a French press?
Start with about four minutes for a standard French press recipe. The ideal time depends on the grind, coffee beans, water temperature, and your preferred flavor. If the coffee tastes weak or sour, try a small adjustment to the grind before extending the steep by a large amount.
Q
Do you need to boil water for French press coffee?
You can boil the water, but it is best to use it at a suitable brewing temperature rather than pouring it straight from a vigorous boil without checking. Aim for around 195–205°F as a starting range. If you do not have a thermometer, let freshly boiled water cool briefly and use the same method each time.
Q
Can you use regular ground coffee in a French press?
Yes, but the grind size matters. Coarse grounds are generally best for a standard French press because they are easier to filter and tend to leave less sediment. Fine, espresso-style grounds can clog the mesh or make the plunger difficult to push. If you only have regular pre-ground coffee, try it, then adjust your method based on the result.
Q
What is the best coffee-to-water ratio for a French press?
A ratio of 1:15 by weight is a useful starting point. For example, use 30 grams of coffee with 450 grams of water. Try 1:14 for a stronger cup or 1:16 for a milder one. The best ratio is the one that produces the strength and flavor you enjoy.
Q
Should you stir French press coffee before plunging?
A gentle stir after pouring can help wet any dry grounds. You do not need to stir repeatedly throughout the steep. Keep agitation modest, then press slowly when the brewing time ends. Excessive movement can disturb settled grounds and increase sediment in the cup.
Q
Can you leave coffee in a French press after brewing?
It is better to pour the coffee into cups or a separate serving vessel after pressing. Leaving it in the carafe keeps it in contact with the grounds and can change its flavor over time. If you make more than you need, transfer the extra coffee promptly rather than leaving it over the grounds.
Q
Why does my French press coffee have sediment?
The metal mesh filter allows some fine coffee particles to pass through, so a small amount of sediment is normal. To reduce it, use a consistent coarse grind, keep the filter clean, and pour slowly. If the sediment is excessive, inspect the screen for damage and consider using a grinder that produces fewer fine particles.
✦ Wrapping Up
Conclusion
Learning how to use a French press coffee maker is easier when you follow a consistent method. Start with coarse grounds, measure your coffee and water, heat the water to a suitable temperature, steep for about four minutes, and press slowly. These simple steps give you a reliable baseline without complicated equipment or expensive accessories.
Once you have a repeatable recipe, adjust the coffee ratio, grind, temperature, or brewing time to match your taste. Change one variable at a time and pay attention to the difference in your cup. A little patience can help you find a balance of strength, aroma, body, and flavor that suits your daily routine.
Keep your French press clean, pour the coffee promptly after pressing, and inspect the carafe and filter for damage. With a few basic habits, you can make a satisfying cup at home and repeat the process with confidence.
💡 Key Takeaway
For your next brew, measure 30 grams of coarse coffee and 450 grams of hot water, steep for four minutes, press slowly, and pour immediately. Taste the result before changing anything, then make one small adjustment if needed.